The Tech Times

Loading

Archives December 2023

freezing Ccleaner Installer

Quick Fix: Why Is My Ccleaner Installer Freezing?

You are not by yourself when you have ever been annoyed by a frozen CCleaner Download. This problem has been experienced by a lot of people, but a simple solution may make all the difference. We will examine the root cause for the CCleaner Installer Freezing during this in-depth tutorial and offer workable fixes for getting your computer’s optimization program back functioning and running.

Understanding the Common Causes

  1. Inadequate System Resources
    When your computer isn’t powerful enough to cope with the whole installation process, their CCleaner installer can crash. Check that that have enough RAM and disk space on the gadget to run CCleaner.
  2. Interference from Antivirus Software
    Occasionally, CCleaner may freeze because overly cautious antivirus software misinterprets the program’s installation procedure for a possible danger. While installing, temporarily turn off your antivirus software, and then turn it back on afterwards.
  3. Corrupted Installation File
    Any incorrect installation files for CCleaner may be the cause of freezing problems. Get the installer from the official website to make certain the downloaded file is complete and clear.
  4. Outdated Operating System
    An out-of-date operating system could cause compatibility problems and cause your CCleaner installer to crash. For a smooth installation, update your operating system to the most recent versions.
  5. Conflicting Background Processes
    Installation of CCleaner may be interfered up by certain unrelated processes. When starting the process of installation, find then terminate any superfluous processes using your Task the supervisor.

Quick Fixes for a Smooth Installation

  1. Check System Requirements
    Verify your system’s specifications from the official website once again while downloading CCleaner. To avoid freezing problems, make sure that your gadget satisfies these specifications or surpasses them.
  2. Temporarily Disable Antivirus
    Turn off your antivirus program for a while to keep out any intervention. After installing CCleaner, don’t forget to restart it.
  3. Download from the Official Website
    To prevent files from becoming corrupt, please downloading its CCleaner installation form the manufacturer’s website. By doing this basic implementation, freezing issues brought about by corruption of files can be resolved.
  4. Update Your Operating System
    Maintaining the latest version of the operating system is essential for interoperability. In order to provide CCleaner with a reliable environment, make sure you installation the most recent updates.
  5. Close Unnecessary Background Processes
    When you install CCleaner, open your Task Manager and close any unwanted programs. This guarantees a more seamless installation that lessens the possibility of disputes.

Conclusion
Throughout summary, users may encounter a discouraging obstacle throughout your pursuit of operating system optimisation if the CCleaner installation freezes. Through comprehension cleaning the typical reasons and application cleaning the suggested short remedies, you can get beyond this obstacle and continue to benefit from CCleaner with any disruptions. When you pay close attention to every step, you will soon have CCleaner installed without any problems and prepared to improve system efficiency.

Can I Download Shows From Acorn TV For Offline Viewing?

Clicke Here

In the fast-paced digital era, entertainment enthusiasts are constantly seeking flexibility in their viewing experiences. Whether commuting, traveling, or simply enjoying downtime without a reliable internet connection, the desire to download shows for offline viewing has become increasingly prevalent. Acorn TV Download streaming service specializing in premium British and international television content, has recognized this need and stepped up to the plate with its offline viewing feature.

Embrace the Freedom:

Gone are the days when a reliable internet connection was a prerequisite for enjoying your favorite shows. Acorn TV understands the importance of flexibility, offering users the ability to download their favorite content and watch it at their convenience, regardless of internet availability. This feature is a game-changer, empowering subscribers to take their entertainment wherever they go.

Simple Steps to Offline Bliss:

Acorn TV has made the process of downloading shows for offline viewing refreshingly straightforward. Users can follow a few simple steps to ensure they never miss a moment of their preferred programming:

Select Your Show: Browse through Acorn TV’s extensive library and choose the series or movie you wish to download.

Download with Ease: Look for the download icon next to the selected content, click it, and let Acorn TV work its magic. The download will commence, ensuring a seamless offline viewing experience.

Enjoy Anytime, Anywhere: Once the download is complete, your chosen show is ready to be enjoyed without the need for an internet connection. It’s entertainment on your terms.

A Library at Your Fingertips:

Acorn TV Offline Viewing feature isn’t limited to a handful of titles; it encompasses a vast library of premium shows, ensuring that there’s always something for everyone. Whether you’re a fan of gripping mysteries, heartwarming dramas, or laugh-out-loud comedies, Acorn TV has you covered.

Stay Updated, Stay Entertained:

Worried about missing the latest episodes of your favorite series while offline? Fear not! Acorn TV’s offline viewing feature allows users to download multiple episodes in advance, keeping you up-to-date and entertained, even in the absence of an internet connection.

Final Thoughts:

Acorn TV commitment to enhancing user experience is evident in its innovative approach to offline viewing. By combining a diverse content library with a user-friendly download feature, the streaming service ensures that subscribers can savor the best in British and international television whenever and wherever they please. So, whether you’re on a long flight, a road trip, or simply relaxing at home, Acorn TV’s offline viewing feature is your passport to uninterrupted entertainment. Embrace the freedom, simplify your viewing experience, and let Acorn TV be your go-to destination for quality offline entertainment.

  • Dec, Thu, 2023

A Guide on How To Troubleshoot Garmin Express Update Issues?

Embarking on a journey with your Garmin device only to be stalled by update issues? Fret not! This comprehensive guide is your roadmap to troubleshoot Garmin Express Update challenges and ensure a smooth navigation experience.

Section 1: Verify Internet Connectivity
First things first – check your internet connection. A stable Wi-Fi or Ethernet connection is essential for a successful Garmin Express update. Resolve connectivity issues to pave the way for a seamless update process.

Section 2: Update Garmin Express Software
Outdated software can be a roadblock. Visit the official Garmin website and ensure you have the latest version of Garmin Express installed. Updating the software addresses compatibility concerns and optimizes performance.

Section 3: Temporarily Disable Security Software
Firewalls and antivirus programs may sometimes impede updates. Temporarily disable these security features, ensuring a secure update process. Remember to reactivate them once the update is complete.

Section 4: Clear Garmin Express Cache
Corrupted cache files can hinder updates. Navigate to Garmin Express settings and clear the cache to eliminate outdated or damaged files, enabling a smoother update.

Section 5: Restart Your Computer and Garmin Device
A classic troubleshooting step – restart both your computer and Garmin device. This simple action can often resolve connectivity issues and refresh the update process. Try the update again after restarting.

Section 6: Reinstall Garmin Express
If all else fails, consider uninstalling and reinstalling Garmin Express. This step resolves underlying software issues, offering a clean slate for a successful update. Download the latest version from the official Garmin website during the reinstall.

Conclusion:
Don’t let update issues steer you off course! Follow these troubleshooting steps to conquer Garmin Express challenges and enjoy a hassle-free navigation experience. From internet connectivity to software updates, empower yourself to navigate the roads confidently. Safe travels!

Ridgeline GPS Not Working
  • Dec, Tue, 2023

Why Is Your Ridgeline GPS Not Working? Here are the Solutions You Need!

Are you experiencing issues with your Ridgeline GPS not working? If so, you’re not alone. Many people have encountered problems with their Ridgeline GPS and have struggled to find a solution. But don’t worry, we’re here to help. In this blog post, we’ll discuss the possible reasons why your Ridgeline GPS is not working and provide you with some troubleshooting tips and frequently asked questions and answers. We’ll also cover the importance of keeping your Ridgeline GPS updated and how it can help resolve any issues. So, if you’re frustrated with your Ridgeline GPS not working, read on to find the solutions you need.

Common Causes of Ridgeline GPS Failure

One of the most frustrating things that can happen when you’re on the road is having your Ridgeline GPS suddenly stop working. It’s a common issue that many Ridgeline owners have experienced, and there can be sevCommon Causes of Ridgeline GPS Failureeral reasons why this happens.

Unstable GPS Signal: One common cause of Ridgeline GPS failure is a poor or unstable GPS signal. If you’re in an area with tall buildings, dense forests, or deep canyons, the GPS signal may struggle to reach your device, resulting in poor performance or a complete loss of signal. Additionally, if your GPS antenna is damaged or obstructed, it can also cause GPS failure.

Outdated Software: Another possible cause of Ridgeline GPS failure is outdated software or maps. GPS devices rely on accurate maps and software to provide you with accurate navigation, and if your device hasn’t been updated in a while, it may not be able to function properly. In some cases, the GPS receiver itself may need a firmware update to fix any bugs or glitches.

Electrical issues: Electrical issues can also cause Ridgeline GPS failure. If there’s a problem with the power supply to your GPS device, such as a blown fuse or a faulty connection, it can prevent the device from turning on or receiving a GPS signal.

Inaccurate Directions: Lastly, if your Ridgeline GPS is not properly calibrated, it can result in inaccurate positioning or directions. It’s important to ensure that your device is calibrated correctly to avoid any potential issues.

The Importance of Regular Ridgeline GPS Updates

Regular updates for your Ridgeline GPS are crucial for maintaining its performance and ensuring accurate navigation. GPS technology is constantly evolving, and new maps, software updates, and bug fixes are released regularly to improve the functionality and reliability of your device.

Updating your Ridgeline GPS is essential for accessing the latest maps, which include new roads, landmarks, and points of interest. This ensures that you have access to the most up-to-date information, allowing for accurate routing and avoiding any potential road closures or detours.

In addition to updated maps, software updates often include improvements to the overall performance of your Ridgeline GPS. These updates can fix bugs or glitches, enhance the user interface, and introduce new features that enhance your navigation experience.

By regularly updating your Ridgeline GPS, you also benefit from increased stability and reliability. Updates can address compatibility issues with other devices or resolve any known issues that may cause your GPS to malfunction or provide inaccurate directions.

To keep your Ridgeline GPS up to date, check for updates on the manufacturer’s website or use their proprietary software to download and install the latest updates. It’s recommended to perform these updates periodically to ensure optimal performance and avoid any potential issues that may arise from outdated software or maps.

Remember, staying on top of regular Ridgeline GPS updates is the key to a seamless and trouble-free navigation experience. Don’t miss out on the improved functionality, accuracy, and performance that comes with keeping your device updated.

Troubleshooting Tips for Your Ridgeline GPS

If your Ridgeline GPS acting up? First, try restarting your device. Sometimes a simple reboot can fix minor glitches and restore functionality. If that doesn’t work, check the GPS settings on your device. Make sure it’s enabled and set to high accuracy mode.

If your Ridgeline GPS is still not working, try resetting it to its factory settings. Keep in mind that this will erase all your saved settings and data, so make sure to back up any important information before proceeding. If all else fails, contact the manufacturer or a professional technician for further assistance.

Remember, regular software updates are essential for optimal GPS performance. So, always check for available updates and install them promptly. By following these troubleshooting tips, you’ll be back on the road with a fully functioning Ridgeline GPS in no time!

How to Update Ridgeline GPS

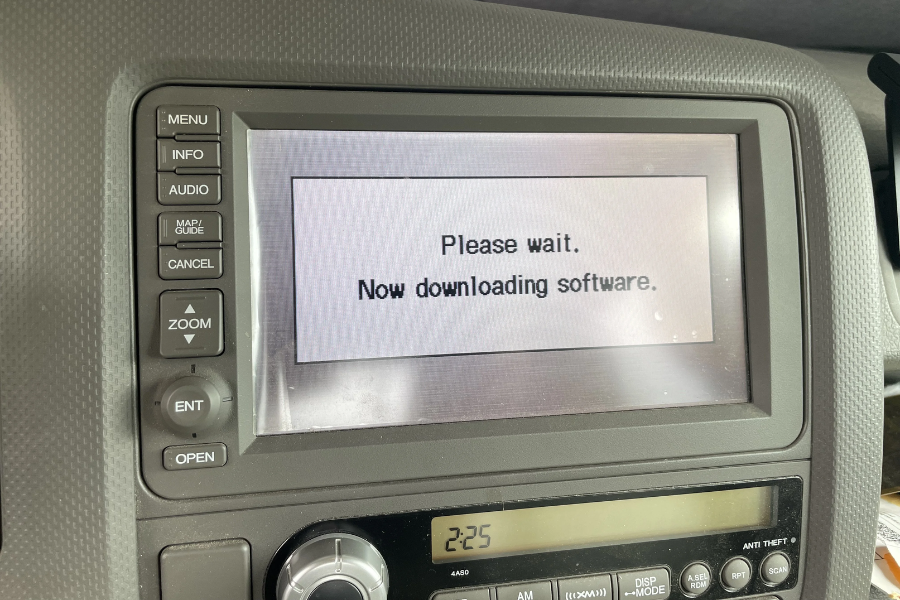
Updating your Ridgeline GPS is a straightforward process that can help resolve many common issues. To perform a Ridgeline GPS update, you’ll need to follow a few simple steps.

First, check the manufacturer’s website for any available updates. They may provide software or firmware updates specifically for your Ridgeline GPS model. If the website doesn’t have updates, try using the manufacturer’s proprietary software to download and install the latest updates. This software is usually available for free and can be easily accessed and installed on your computer.

Once you have the updates downloaded, connect your Ridgeline GPS to your computer using a USB cable. Open the software and follow the on-screen instructions to initiate the update process. This may involve selecting your device model and confirming that you want to update the software.

During the update, it’s important to ensure that your Ridgeline GPS remains connected to the computer and that it doesn’t lose power. Some updates can take several minutes to complete, so be patient and avoid interrupting the process.

Once the update is finished, disconnect your Ridgeline GPS from the computer and turn it on. You should now have the latest software and maps installed, which will enhance the functionality and accuracy of your GPS.

Remember to perform regular Ridgeline GPS updates to ensure optimal performance and avoid any potential issues that may arise from outdated software or maps. By staying up to date, you’ll be able to enjoy a seamless and trouble-free navigation experience.

Frequently Asked Questions about Ridgeline GPS

Have some burning questions about your Ridgeline GPS? We’ve got you covered with answers to some of the most frequently asked questions.

Q: My Ridgeline GPS is not turning on. What should I do?

A: First, make sure that the power supply to your device is working properly. Check the fuse and connections to ensure they’re not faulty. If the power supply is fine and the GPS still won’t turn on, try resetting it to factory settings or contact the manufacturer for further assistance.

Q: How often should I update my Ridgeline GPS?

A: It’s recommended to update your Ridgeline GPS regularly to ensure optimal performance. Check for updates on the manufacturer’s website or use their proprietary software to download and install the latest updates. Aim to perform these updates periodically to stay on top of any potential issues.

Q: My Ridgeline GPS is showing incorrect directions. What should I do?

A: First, ensure that your GPS is properly calibrated. Check the settings and follow the manufacturer’s instructions to calibrate your device correctly. If the issue persists, try updating your maps and software to the latest version, as this can often resolve any inaccuracies.

Q: How can I improve the GPS signal on my Ridgeline GPS?

A: If you’re experiencing a weak GPS signal, try moving to an area with a clearer view of the sky, away from tall buildings or dense forests. You can also check if the GPS antenna on your device is damaged or obstructed. If so, consider getting it repaired or replaced.

Remember, if you have any further questions or issues with your Ridgeline GPS, don’t hesitate to contact the manufacturer or seek professional assistance.

In Conclusion

To wrap things up, experiencing issues with your Ridgeline GPS can be frustrating, but there are solutions available. In this blog post, we discussed common causes of Ridgeline GPS failure, including poor GPS signal, outdated software or maps, electrical issues, and calibration problems. We also emphasized the importance of regular GPS updates to maintain optimal performance and accuracy.

What Is The Latest Version Of Ccleaner Download?

Click Here

In the fast-paced world of digital optimization, staying up-to-date with the latest software versions is key to unlocking enhanced features and security. If you’re eager to elevate your PC performance, you may be wondering, “What is the latest version of CCleaner available for download?” In this comprehensive guide, we’ll unravel the current iteration of Download CCleaner Latest Version, shedding light on the benefits it brings to your system.

The Latest Version: CCleaner [Insert Version Number]
As of [Current Date], the latest version of CCleaner is [Insert Version Number]. To ensure you have the most recent features, improvements, and security patches, it’s advisable to download and install this version from the official CCleaner website.

Key Features and Enhancements:

Performance Boost: Each CCleaner update is meticulously crafted to optimize your PC’s performance. The latest version introduces advanced algorithms and refined cleaning processes, ensuring your system operates at its peak.

Enhanced Compatibility: CCleaner developers are committed to staying ahead of the curve. The latest version is designed to seamlessly integrate with the latest Windows updates and other software, providing a smooth and reliable experience.

Security Upgrades: Cybersecurity is a top priority, and CCleaner’s updates often include enhanced security measures. By regularly updating to the latest version, you fortify your system against potential vulnerabilities, contributing to a safer digital environment.

How to Download the Latest Version:

Visit the Official CCleaner Website: Access the official CCleaner website at CCleaner Download to ensure a secure and authentic download.

Navigate to the Downloads Section: On the website, locate the “Download” section. Here, you’ll find the latest version of CCleaner available for download.

Select Your Edition: CCleaner offers both Free and Professional editions. Choose the edition that aligns with your needs and click on the “Download” button.

Run the Installer: Once the download is complete, run the installer to begin the installation process. Follow the on-screen instructions to install the latest version of CCleaner on your system.

Conclusion:
Embrace the cutting-edge capabilities of the latest CCleaner version to optimize your PC and elevate your digital experience. By staying current with software updates, you not only enjoy enhanced performance but also benefit from the continuous commitment of CCleaner developers to deliver a top-tier optimization tool. Download the latest version today and embark on a journey toward a faster, cleaner, and more secure computing environment.

  • Dec, Tue, 2023

How To Check For Garmin Software Updates?

Staying current in the most recent upgrades to software is crucial in this ever evolving world of calculating for ensuring maximum efficiency and access to new features. Updating your device guarantees Garmin International customers a flawless and enhanced expertise. It’s simple to carry out. This comprehensive tutorial will walk you through the steps of quickly checking for Garmin software update and keeping your device in optimal condition.

  1. Connect Your Garmin Device:
    First, use the included USB connector for linking your Garmin device to your computer. The following creates an immediate link, enabling a smooth refresh manage, between your device and Garmin’s online servers.
  2. Install Garmin Express:
    Visit the genuine how to update Garmin website to download Garmin Express, a program designed specifically for managing and updating Garmin devices. Installing maps, updating software, and synchronizing information are only a few for the various functions that can be accessed through that adaptable app.
  3. Launch Garmin Express:
    Start Garmin Express Update on your computer following the application has been installed. You’re related Garmin gadget gets consequently recognized by the program, which then displays pertinent details like the software version and available updates.
  4. Check for Updates:
    Explore Garmin Express and find the “Updates” tab. A thorough summary of the software updates currently accessible on your gadget can be given in this section. An alert will tell your to keep going in the procedure when there’s a new version accessible.
  5. Follow On-Screen Instructions:
    When you click the update prompt, Garmin Express will walk you through the update procedure with easy-to-follow on-screen directions. To avoid any disruptions during the update process, ensure that your Garmin device remains online at all times.
  6. Backup Your Data (Optional):
    While Garmin updates are generally seamless, it’s a good practice to back up your device’s data before initiating the update process. Garmin Express provides an option to create a backup, offering an extra layer of security for your valuable information.
  7. Monitor the Update Progress:
    Keep an eye for the Garmin Express advance bar as the software upgrade moves along. Depending on the size of the update and the speed of your connection to the internet, this procedure may require a while. The secret to an effective refresh was perseverance.
  8. Safely Disconnect Your Device:
    Disconnect your Garmin device from the computer effectively after the update was finished. To guarantee that the new software is properly incorporated, restart the gadget.
  9. Enjoy the Enhanced Features:
    Examine the new features and improvements on your Garmin device by using the most recent apps. Staying current ensures that you get the most out of any Garmin experience—bug repairs, enhanced performance, and fresh capabilities, for example.
  10. Set Automatic Updates (Optional):
    To streamline the update process in the future, consider configuring Garmin Express to automatically check for updates. This ensures that your device remains current without manual intervention.

To sum up, updating the operating system on the Garmin you’re using proved an easy process as well as guarantees maximum efficiency. By adhering to the easy steps below, you are able to optimize your Garmin device and maintain it during the cutting edge of creativity within the rapidly evolving field of computation.

  • Dec, Mon, 2023

How Often Do TomTom GPS Map Need To Be Updated?

In the fast-paced world of navigation technology, staying on top of the game involves more than just having a reliable GPS device – it’s about keeping your maps up-to-date. For TomTom users, the question often arises: How often do TomTom GPS maps need updating? This guide provides insights into the factors influencing update frequency and helps you navigate the optimal update schedule.

Factors Influencing Update Frequency:

Road Changes and Developments:
TomTom updates its maps to reflect changes in roads, highways, and infrastructure. New roads, closures, and alterations to existing routes are constantly evolving, making regular updates essential for accurate navigation.

Points of Interest (POI) Updates:
Frequent updates ensure that your GPS is aware of the latest Points of Interest, such as new restaurants, businesses, and attractions. Staying current with POIs enhances the overall utility of your TomTom device.

Traffic and Route Optimization:
TomTom relies on real-time traffic data to provide efficient route suggestions. Regular map updates incorporate this dynamic information, enabling your GPS to adapt to changing traffic conditions and offering the most optimized routes.

Software Enhancements:
Alongside map updates, TomTom releases software enhancements to improve the functionality and performance of your GPS device. Keeping both maps and software up-to-date ensures a seamless and reliable navigation experience.

Determining the Update Frequency:

The frequency of TomTom GPS Map Update depends on various factors, including your location, usage patterns, and the specific model of your GPS device. However, as a general guideline:

Quarterly Updates:
TomTom typically releases major map updates on a quarterly basis. These updates include significant changes to roads, new POIs, and other relevant information. Checking for updates every three months is advisable to ensure your maps are current.

Monthly Software Updates:
In addition to quarterly map updates, TomTom may release monthly software updates. These updates focus on improving the overall functionality and responsiveness of your GPS device. Regularly checking for both map and software updates each month is a good practice.

Real-Time and Community Updates:
TomTom encourages users to contribute to map accuracy through its community updates. Enabling real-time traffic and community updates in your device settings ensures you receive the latest information from fellow TomTom users, enhancing the precision of your navigation.

Conclusion:

To maximize the efficiency of your TomTom GPS Update, regular map updates are essential. The frequency of updates depends on the dynamic nature of roads, points of interest, and ongoing software enhancements. Stay ahead of the curve by checking for quarterly map updates, monthly software improvements, and enabling real-time community updates. By doing so, you’ll ensure that your TomTom GPS is always equipped to guide you accurately, reflecting the ever-changing landscape of the roads you travel. Keep your maps current, and let your TomTom GPS lead you confidently on every journey.

Why Is My Netgear Nighthawk Router Wi-Fi Not Working

Click Here

In the world of today, a dependable Wi-Fi connection is essential, therefore it may be rather annoying when your Netgear Nighthawk Router Wi-Fi Not Working. Don’t worry when you’re experiencing problems with the WiFi on your Nighthawk router; we have that prepared. We’re going to lead customers thorough an easy debugging procedure in this article to get the Wi-Fi on your Netgear Nighthawk router operating again.

Check Power and Connections:

Check that the power source is correctly linked to your Nighthawk router.
Make sure that each wire connection, such as the internet connection while power lines, is safe.

Router Reboot:
Occasionally all that’s needed is a quick reboot. To do an electrical period, remove your router, wait 30 seconds, and then plug it back into.
Give the router some time to settle down then restart.

Firmware Update:
Verify that the software on your router is current. Performance problems may be caused by an obsolete software.
To upgrade the software for your router, go onto the Netgear support website and adhere to the on-screen directions.

Wi-Fi Channel Interference:
Inspect your gadgets for interference from other electronics or nearby wireless networks.
To reduce disruption, change the Wi-Fi channel by logging onto the administrator interface of your router.

Signal Range and Placement:
For best protection, make sure your router is situated in the middle of the room.
Steer clear of obstructions including disturbance including metal items, walls, and other types of electronics.

SSID and Password Verification:
Verify sure the password and WiFi connection name (SSID) are entered properly for your devices.
It is advisable to modify the password for the wireless network for safety reasons.

Security Settings:
Verify your router’s safety configuration. It is advised to use WPA2 or WPA3 for greater safety.
If necessary, upgrade the wireless network secure key.

Device Limitations:
Verify whether the maximum number of devices that can join the network via Wi-Fi is limited.
If needed, change your preferences to fit all of your gadgets.

Factory Reset (if necessary):
We might perform a complete reset on your router as a final resort. Clicking will remove all your own customized settings, so be warned.
To do a complete reset for your router, adhere to the directions provided within the manual.

Conclusion:
We ought to have been able to locate and fix the problems influencing the wireless network functionality of your Netgear Nighthawk router with those methods for troubleshooting. Please be sure to reach out to Netgear customer care if the problem continues to arise. You need a steady and dependable Wi-Fi connection, and using a little perseverance as well as those troubleshoot pointers, you should be ready to get your Nighthawk router back up and running within no time.

Why Is My Netgear Router Not Connecting To Nighthawk Wi-Fi?

Click Here

Are you grappling with the frustration of My Netgear Nighthawk Router Not Connect to WiFi? Fear not, as we embark on a journey to demystify the common culprits behind this issue and provide you with a comprehensive troubleshooting guide to get your WiFi back up and running.

Check the Basics:
First and foremost, let’s ensure the basics are in order. Verify that your router is powered on, and the LED lights indicate normal operation. Confirm the physical connections, and don’t forget to check if your internet service is active.

Wi-Fi Network Name and Password:
Double-check the WiFi network name (SSID) and password. Typos or incorrect entries can lead to connection issues. Access your router settings through a wired connection if needed, and make sure the WiFi details match your intended configuration.

Wireless Interference:
WiFi signals can be disrupted by interference from other electronic devices, neighboring networks, or even household appliances. Try changing your router’s channel settings to reduce interference and enhance connectivity.

Firmware Update:
Outdated firmware can be a major stumbling block. Access your router’s settings and check for firmware updates. If available, install the latest version to benefit from bug fixes and improved performance.

Signal Range and Placement:
Ensure your device is within the router’s signal range. Physical obstacles, such as walls or large furniture, can obstruct WiFi signals. Experiment with router placement or consider using WiFi range extenders for broader coverage.

Device Compatibility:
Confirm that your devices are compatible with the WiFi standards supported by your Nighthawk router. Sometimes, older devices may struggle to connect to modern routers. If necessary, update your device’s WiFi drivers.

Security Settings:
Security features, while essential, can sometimes cause connection problems. Check if your router security settings, such as WPA2 or WPA3, align with your device’s capabilities. Temporarily disable security features for troubleshooting purposes, and re-enable them after resolving the issue.

Reset to Factory Defaults:
When all else fails, consider resetting your Nighthawk router to its factory defaults. This step erases all personalized settings, so make sure to note them down before proceeding. After the reset, reconfigure your router settings and check if the WiFi connection is restored.

Contact Netgear Support:
If the issue persists, it might be time to seek professional assistance. Reach out to Netgear customer support for personalized guidance. Provide them with details about your setup, the troubleshooting steps you’ve taken, and any error messages you’ve encountered.

Conclusion:
Navigating the intricacies of Netgear Nighthawk router WiFi connection issues can be challenging, but armed with this comprehensive troubleshooting guide, you’re well-equipped to identify and resolve the underlying issues. May your WiFi signal be strong and your internet connection seamless!